Photon PUN is an excellent system for Networking, and has helped us network countless Unity games very easily and quickly. But, there are a few quirks for how it operates that are definitely not intuitive at first. So, in our effort to democratise knowledge, we thought we would write a post sharing three top tips for PUN that will help you become a networking expert in no time!
Bear in mind, this article will be discussing some advanced Photon PUN concepts. If you’d rather start with an entry-level article, why not check out this one.
1. Manually Instantiate your Photon Views
This is a very cool one, and a great place to start. Despite what your intro to programming course may have taught you, Singletons are awesome. I don’t think I’ve ever worked on a games project that didn’t make cautious but loving use of singletons. However, when you want to use a singleton that also has networking functionality, you may run into some problems.
Lets take the case of an AudioManager, that controls things like cross-scene music (and maybe even sound effects). This should be a singleton, so you run no risk of playing multiple BGM tracks at once. It should also exist across scenes, so you’ll make sure you don’t destroy it when changing scenes. But, you probably want a copy in every scene, so that no matter which scenes you move through (especially if you’re starting from an arbitrary scene in the Unity Editor), you will always have access to the singleton.
This presents some problems. You can’t just add a PhotonView to the object in the scene and give it a specific PhotonView, as that runs the risk of it’s viewID colliding with other objects. You could create an “Audio Manager Creator” object, which sometimes dynamically instantiates your audio manager, but that’s getting very specific and strange.
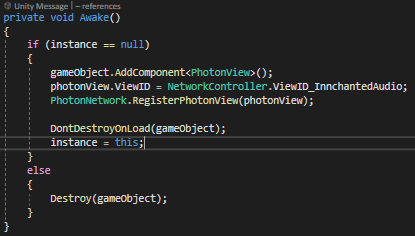
So, instead, why not just manually create and assign the Photon View. Using the code to the right, we check if the Singleton already exists, and if not, creates a photon view, dynamically assigns a number for it, and sets it to not destroy.
Beautiful! Now we have our networked, scene-persistent singleton object! How wonderful. This first trick is not only a wonderful tip, but also the tip of the iceberg when it comes to instantiating and configuring PhotonViews in code. PhotonViews are (in my experience) laborious to configure across a large number of prefabs, so getting used to creating and configuring them in code instead will save you a lot of headache long-term! Now, on to tip number two!
2. nameof
This is going to be a quick tip, and one that will save you a ton of time debugging if used judiciously. Any PUN project will make a lot of use of RPCs (explained in this previous blog post). The problem with RPCs is that you need to refer to them by string.
This causes major headache when debugging, as you can’t easily make use of a whole number of code editing tools on those strings, as your editor won’t associate those strings with the functions that they represent. Doing things like finding references, and tracking your code, becomes much harder!

Enter nameof. This beautiful, short little function will allow you to preserve your function references across RPCs. This is a quick tip that once learned will save you a ton of time. You’re welcome!
3. Child Photon Views
Our final tip has to do with instantiation of Photon Views on prefabs. Often, prefabs can get very complicated, especially if your game mandates you have a number of nested objects. In one of our current projects, character objects have parents which control movement and animation, with children one or two layers deep changing rotation to ensure everything looks smooth.
This works great, but when it comes time to network, it means that we need to write custom IPunObservable implementations to ensure that child rotation is being synced properly. Or… we use child photon views!
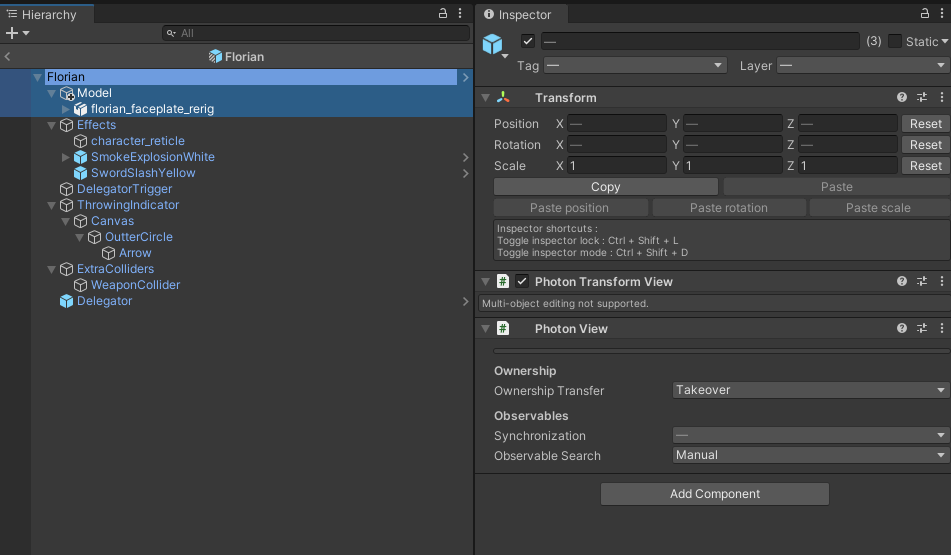
If you instantiate a prefab, children of that prefab with PhotonViews are also dynamically instantiated and networked. This means you can add as many PhotonViews as you like to child objects of your prefabs, and they will all get networked, allowing you to put PhotonAnimatorViews or other IPunObservable components on them for easy (and intuitive) networking!
There are a few things to keep in mind when doing this. The main one to consider is that child PhotonViews have some special behaviour when being destroyed. As an example, if you attempt to call PhotonNetwork.Destroy() on a PhotonView that is the child of another PhotonView, it will instead destroy the parent object. This can sometimes be useful (e.g. you don’t want to destroy PART of a character), and sometimes not.
As an example, we also use this trick when instantiating levels. In our current project, we have one main Game Scene, and objects are dynamically loaded within it to create levels. If those objects are networked, it works fine to ensure that they spawn synchronized, but problems arise when they are being destroyed.
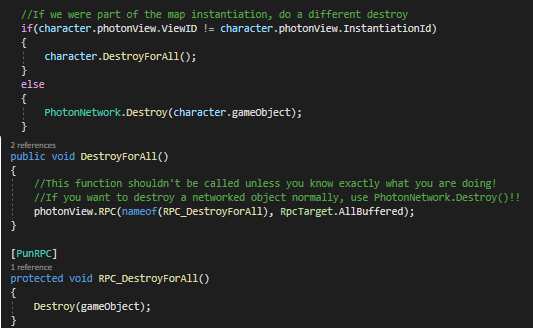
Here’s the code that we use to get around this problem – effectively it ensures that if a PhotonView has been instantiated as the child of another PhotonView, instead of doing a standard PhotonNetwork.Destroy, we simply call an RPC which destroys the object across all clients. This is an unorthodox solution, but works perfectly well (after all, that’s more or less what PhotonNetwork.Destroy does anyway).
Wrapup
Those are the three top tips I have for you today! No doubt, as I continue learning more about Photon PUN, I will continue to amass tips, so pop your email below if you want to make sure you’re notified when more tips come up.
If you have any other Photon PUN tips that you’d like to share, feel free to let me know! Otherwise, see you next time!
We hope you enjoyed reading this! Have a question or want to chat more about game development? Reach out to us!
Other places you can find us:
- Our other game development resources
- Join our Discord server