Continuing our trend of sharing knowledge for Production Unity systems, today we are going to talk about Environment Switching. For those of you who might be unfamiliar, the concept of environments is something incredibly useful when creating live-services games. We want to set up testing and development environments, so that different data and functions can run across different environments.
Why do we want this? Well, there are a number of reasons! What if:
- We want a title to be able to send emails, but don’t want to spam people on the testing environments, so we want this disabled everywhere that isn’t production.
- We want to set up a number of ‘testing’ user accounts, but only on non-production environments
- Our development server is a single server, to save on production cost, but on testing and production, we run across multiple servers, and so need to do some things slightly differently.
All of these require an application to know what environment it is running on, and take slightly different actions. So – lets talk about how to make that happen!
Environment Switching in Code
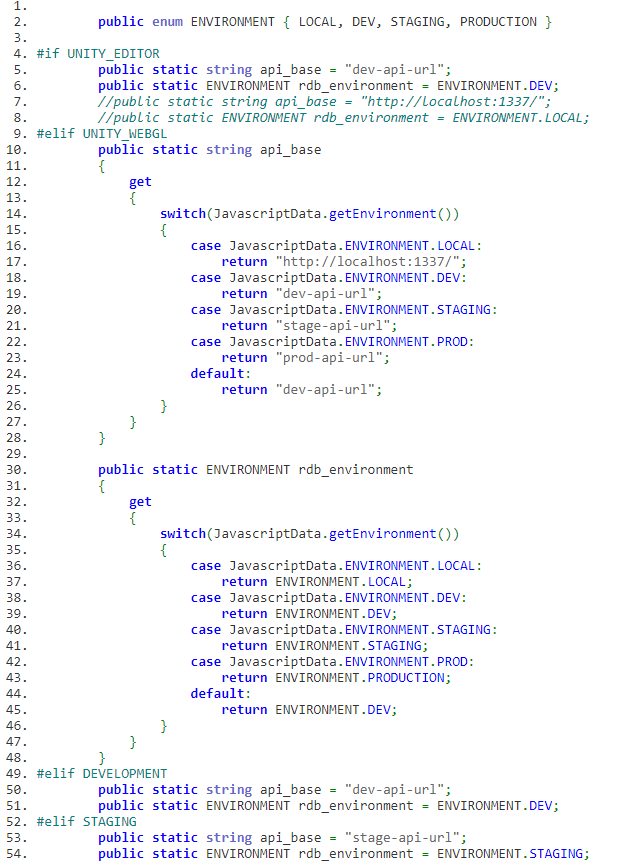
The first thing to do is take a look at what code we have in place to access the environment. In this image, you’ll see some of the environment switching code. The main thing that it does is check the platform, and depending on the platform, checks the environment in a few different ways.
Based on the environment, we set the base-api for our API calls, as well as an ENVIRONMENT variable we can check later. That rdb_environment variable is used to do things like separate chat rooms and game lobbies, so that when you’re looking for a game lobby, you only find lobbies that are on your current environment.
Cloud Build Setup
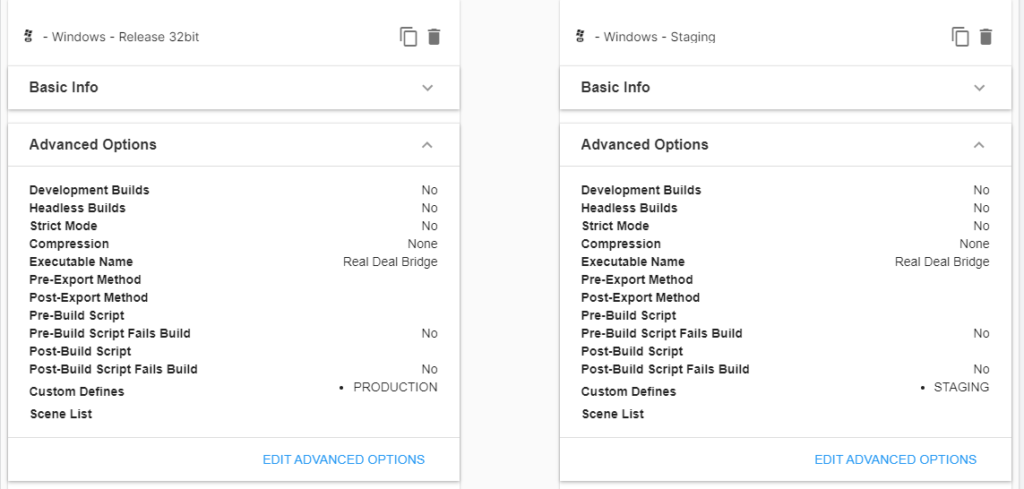
The next thing that needs to be done to set this up is set up your build pipeline. In the screenshot above, you can see our Production and Staging windows builds. You can see we have set custom defines for these, which is what tells the builds the environment that they are in.
WebGL Setup
For WebGL, the setup is slightly more complicated. This is because we want to do something a bit more traditional for WebGL, which is have one build that goes across all environments. So – the server needs to tell the build which environment it is running in. Here’s how that works:
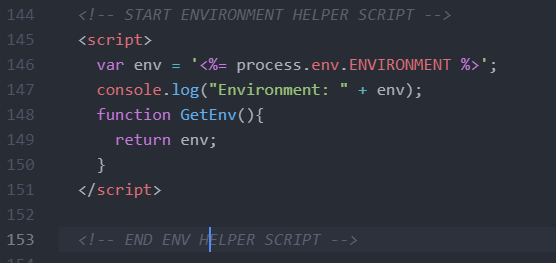
In our container for the WebGL build, we have this little line of code. This populates the environment with the environment variable from the process, similar to how you would do environment switching in traditional web development.
Then, in Unity, we call this GetEnv() function, which grabs that string and passes it into the Unity WebGL container. This then interacts with the GetJavascriptEnvironment() function seen above, to convert that to a regular ENVIRONMENT enum variable, same as all the other platforms.
In Summary
Developing production level applications in Unity can be a fair amount of work, but the benefits are definitely worth it. Hopefully this series is useful to people who are looking for ways to clean up their production pipeline in Unity.
There are a number of moving parts, but hopefully over this series we are able to illuminate them all. If anybody has any questions, as usual, feel free to leave a comment and we will happily shed more light on anything that is unclear!
We hope you enjoyed reading this! Have a question or want to chat more about game development? Reach out to us!
Other places you can find us:
- Our other game development resources
- Join our Discord server