During a workshop on developing games with porting in mind, Reuben shared common programming pitfalls and approaches that make porting easy down the line. The following is an edited transcription of the workshop’s contents, which we hope will be useful reading to fellow developers! For the full workshop recording, check out the YouTube upload here!
You can also find the sample project Reuben has made to illustrate the following topics here.
We’ve worked with several indie devs who have made a game on Steam that they want to port to Switch, Xbox, PlayStation or more. From this, we wanted to share some of the common pitfalls we have seen, especially from indie teams that are sometimes relatively new to making a game or going from hobby projects to commercial ventures. Here are my tips for developing your game in a way that makes porting easy down the line!
Firstly, the suggestions in this blog are Unity-focused! Unity makes porting things pretty easy. Having done some porting work that was in Unreal Engine, my first tip, if you want to make a game that’s getting ported: use Unity.
Regardless, the things we’ll be talking about here will likely apply to other engines. This is because we aren’t covering the specific aspects of the SDKs involved for these console platforms. We have NDAs that prevent us from showing anything, anyway!
Instead, what we’ll be focusing on is how to structure your project to make it easy to port your game, regardless of what that platform is. This is relevant whether you ever even do port to a platform or not! (As is commonplace amongst indie teams.) These tips will also be more useful, as the actual things that you’d be implementing for your game are often different depending on your title.
Cleaner code = games that are more painless to port

The undercurrent theme throughout this blog is that: projects are easier to port the cleaner they are. If your project is laid out cleanly, nicely segmented and modular, that makes your project easier to port. We’ll be talking about structures and techniques you can use to make your game cleaner in general, specifically in a way that helps with porting. Here are the specific concepts we’ll be covering:
Services Models
Services models are models that allow us to easily manage different components and, in the context of porting your games, allow us to switch them out based on platforms. This is not a porting-specific thing, but a general setup that is helpful to ensure that you’re setting your project up in a modular way.
What a lot of indie teams start with is setting up a boot scene: a scene that initializes things for you. This is very helpful to have when you’re making a game that can be cross-platform because a lot of the platforms have things that need to happen at instantiation.
But… something that we’ve seen with a few of our clients is that they will have things that exist inside this boot scene that are required for their game to run.
The issue compounds itself as we attempt to initialise other scenes. For example, when we want to start from a specific level. We’ve had clients say they resolve things by going “I’ll just go to this level, drop this prefab, and make sure everything’s in there.” That’s not a great system. You want a game that is set up in a clean and organised way that initializes itself no matter where you start.
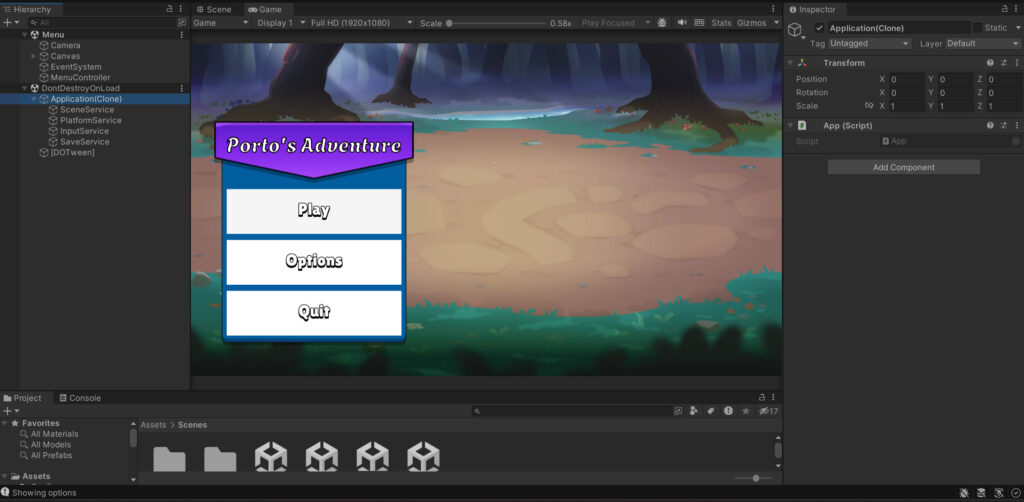
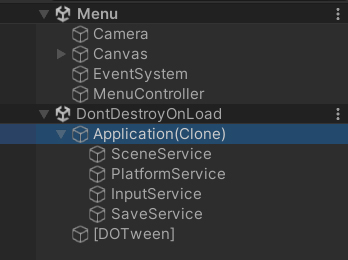
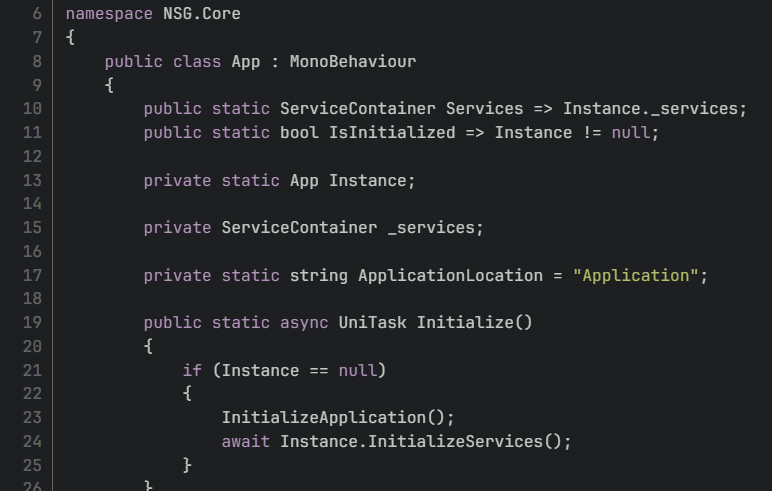
In our sample project, Porto’s Adventure, we share a general model for how we’ve done a few different things. It has a self-initializing core and an application plug-in. When your scenes boot up, they go to this application, the plug-in initializes and then the scene begins.
To illustrate, when attempting to load Porto’s Adventure’s menu scene, we have this MenuController, which is a subclass of a SceneController, which does the following:
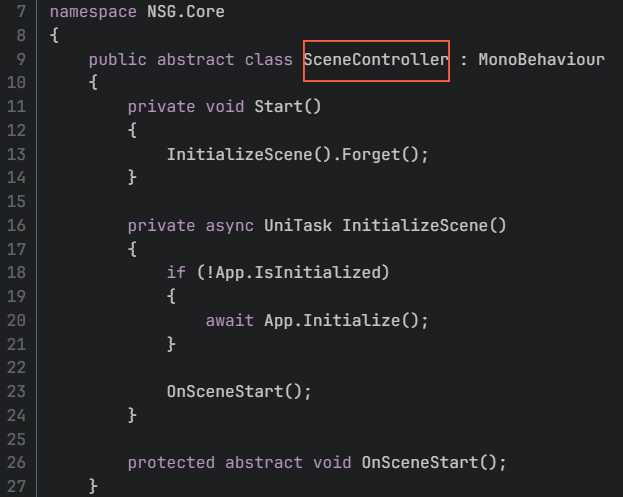
SceneController. - It Starts.
- Call this
InitializeSceneroutine which initializes the app if it’s not initialized - Then calls this abstract function
OnSceneStart - Then, on
OnSceneStart, the menu controller selects the play button as the first piece of UI to load.
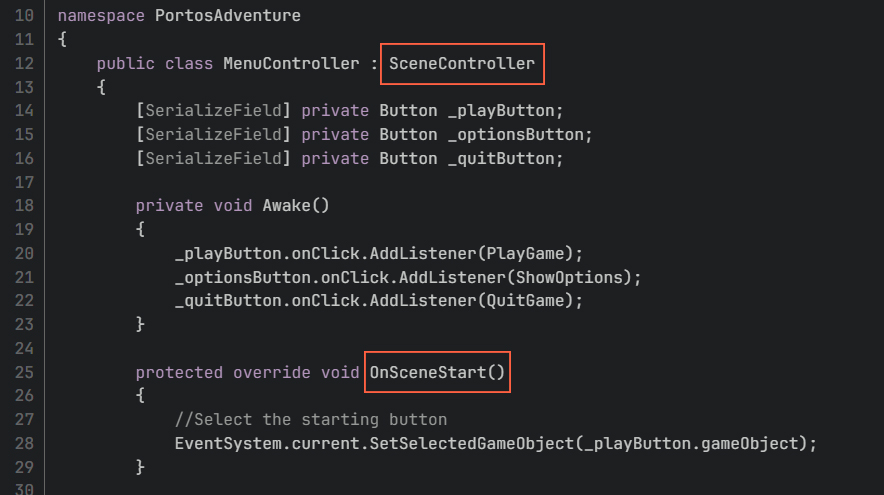
MenuController.This is a simple setup, but important to understand conceptually especially if you’re porting your game from a PC build to consoles. It’s common to overlook the concept that, on console, things take more time to initialize than you might expect.
For example, on startup, say we’re loading up our menu and want to populate the volume settings to have that volume set based on SaveData, which might be 50%. On a console, loading that data is quite a process: you have to first make sure you’re signed in as a user, then get the data for that user. Potentially, you might have to do other things like mount the file system and those take time— they’re not going to happen in a cycle. So, something that we will typically do is enforce a system like this that has, as part of its initialization, asynchronous functions that wait for things to load.
In addition, we don’t have to place a game controller in the scene. Our services model lets us wait for the application to tell us when things are finished initializing before things kick off.
Input
The first step for porting a game to consoles is making sure that it works with gamepad. If your game works with controllers on PC, it will be much easier to get it working with controllers on other consoles.
If you’re developing a game in Unity and you want to get it to consoles: use the new Unity input system! It lets you bind actions and have all different kinds of control profiles for different controllers and buttons.

This also works nicely with the Unity UI system, where it automatically detects key presses and navigates selectable components like buttons or dropdowns. You can get controller support for things like UI easily this way as a result.
Saves
Centralise your SaveData as much as possible! The services model is great for this. In our example, you can see SaveService has very simple functions for waiting for save and load, which can be done asynchronously before continuing in our game when we’re loading from a different scene.
When most folks start developing with Unity, they will likely use PlayerPrefs, which doesn’t work on consoles, so you don’t want to be using that! But even as a starting point, I think PlayerPrefs gets you into this terrible mindset of: “I can access this static data from anywhere.” If a client were using PlayerPrefs, we would have to replace them, but even then we might be accessing and adjusting data from a lot of different places making things disorganised.
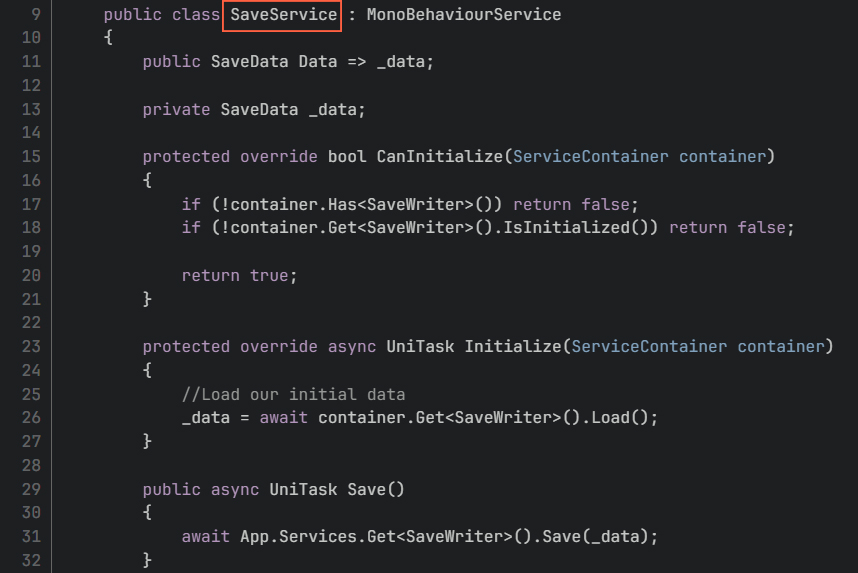
SaveService.That’s why we use SaveService, which has one reference to SaveData. The only way to access and load SaveData is through this service centralising it all. Though saves can get complex, most projects will find it fine to do what I’m doing here, which is just serializing it as JSON and then converting that to saving.
You can encrypt this and get crazier as you want to but the point of this is to set up your system in a way that things are centralised. Then, if you want to encrypt SavedData, change the data to binary, or do any other transformations, because it’s all centralised, these become easy to do.
Yet another example of that is the SaveWriter class. SaveService accesses SaveWriter, which is another service, but SaveWriter is abstract with a basic FileSaveWriter. This has some overrides: a PlayStationFileSaveWriter, a SwitchFileSaveWriter and an XboxFileSaveWriter. In Porto’s Adventure, these are all blank, but in essence, for porting we’ll need separate save logic for each platform we’re porting to.
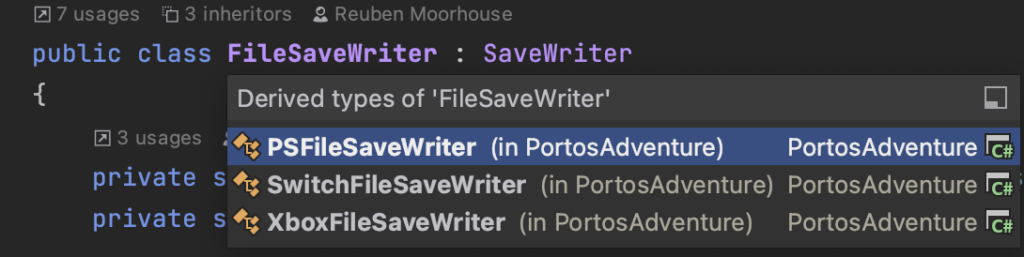
FileSaveWriterFor most of them you’ll need to have a logged-in user to SaveData and you’ll need to mount to that user file system and confirm that you can save data as that user. With a system like this, you can have an abstract version of a service. Your SaveService doesn’t care what SaveData it has, it just cares that it has one that’s initialized. You can plug that in later with a different platform service,
Loading
Loading is yet another aspect of your game that is better as a service. Similar to what we talked about for the SaveService, it’s good to be centralised. This LoadScene async function calls the SceneManager to load scene.
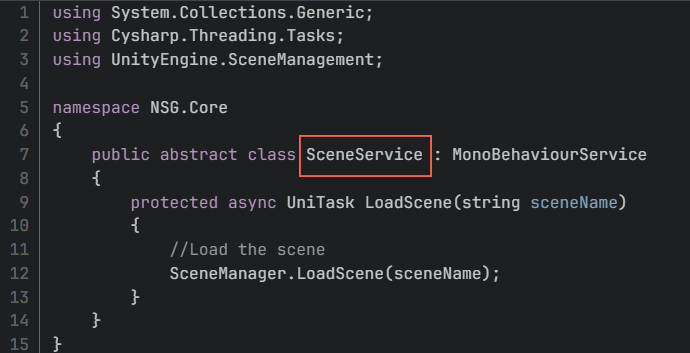
SceneService and how it loads scenes.It’s doing nothing at all in this scene service but that’s okay because it’s centralised.
Down the line, we might want to do things depending on the platform or something else, like turning this into asynchronous loading, loading asset bundles, transitioning to a loading scene or doing a fade in and out. By centralising our efforts, making them consistent across loads and simple at the start of our project, we make things easier for any added complexity in the future.
Things change throughout development. You might want to have things less centralised things into services later, but starting off this way means you can go crazy with them down the line without having to worry about needing to change a bunch of different load calls. For console porting, there are a lot of upgrades that you might need to do to your loading scene. For example, depending on the platform, you might want to implement addressables to cut down patch sizes or cut down the size of your executable and all that jazz.
Platform Systems
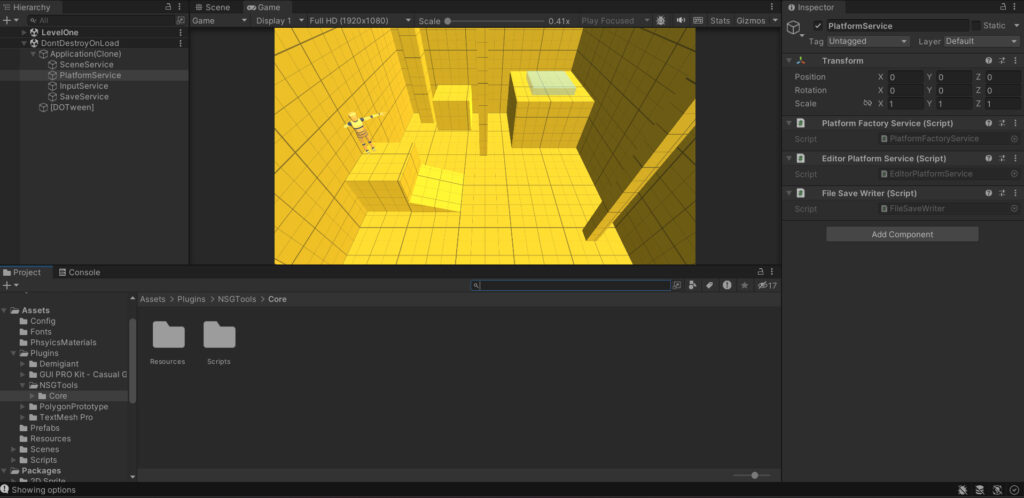
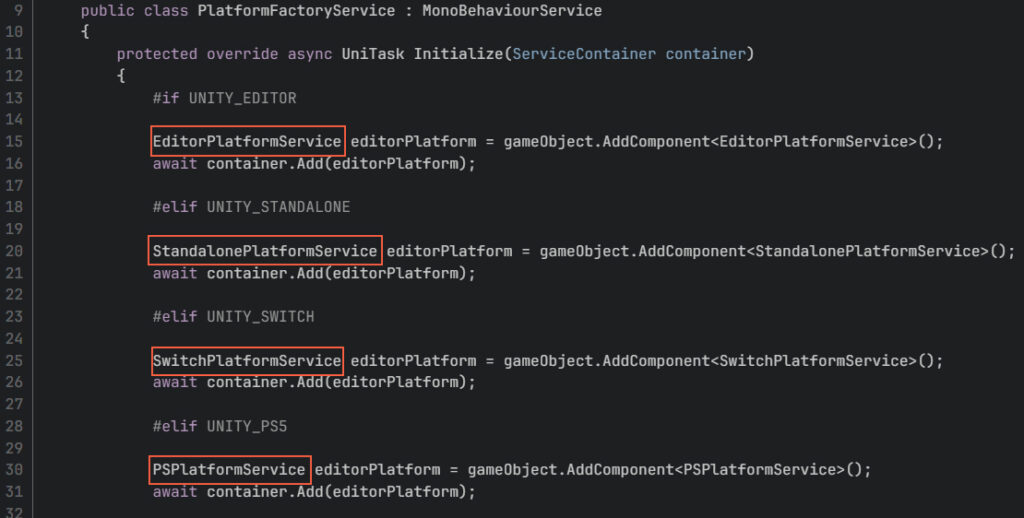
This is going to be another example of when our services model becomes very helpful. To illustrate, when we boot up Porto’s Adventure, we’ll initialize all of our services, including our PlatformService. It has PlatformFactoryService which initializes all of our other services depending on what platform we’re on.
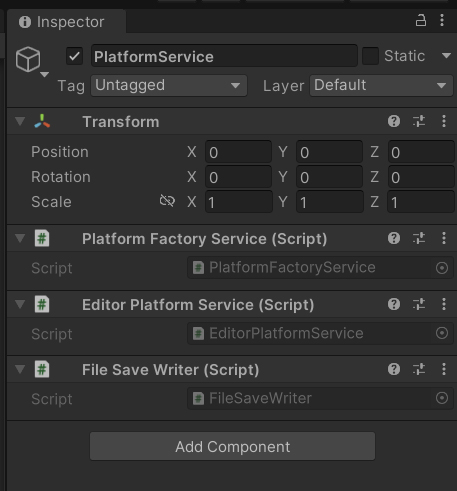
PlatformService in action! So, if we’re on editor, we create an initial EditorPlatformService, Standalone, Switch, PS5 and so forth. Those platform services have their own initialize that does things like add a file, SaveWriter and so forth.
Like the save system, you want to switch out different versions of a service without necessarily any of the rest of the logic. For a practical example, achievements: All platforms use different achievements. So if we’re deploying on Steam we would have Steam achievements, PlayStation would have trophies, Xbox has achievements, Switch doesn’t have achievements and other cases. We might want to have a system for Switch, where we have a SwitchAchievementService which effectively does nothing except logging to a file.
It doesn’t matter to the code what that achievement service is, whether it’s the PlayStationAchievementService, the SteamAchievementService, or the kind of no-achievement service that we might implement for Switch, this code just calls whatever AchievementService is available, and it’s up to the service to handle its own implementation of these achievements, without any need for a big “Achievement Manager”.
This system can become complex if, for example, the console we’re developing for can have multiple different users logged in and multiple different users should be able to progress their own achievements while they’re logged in. Even when things get incredibly complex due to platform specifics, a services model like this that allows you to swap things in and out makes development much easier.
We can easily set this up, and all these services would handle themselves completely independently and modularly. The only place where we would need to use any custom defines is in that factory that has added those different services.
To conclude
We hope this helped you rethink how you structure your projects to make them easier for porting! We’ve skipped out on the QnA covered in the workshop, so if you’d like to have a listen, the video’s here. As for the sample project, Porto’s Adventure, take a look and steal those plugins!
We hope you enjoyed reading this! Have a question or want to chat more about game development? Reach out to us!
Other places you can find us:
- Our other game development resources
- Join our Discord server