A recipe for success
Last time, we discussed the basics of how to ensure that Unity WebGL can run in a production environment, and now it’s time to dive further into that topic. Today, we’ll be going step-by-step on how to set up continuous deployment for a Unity WebGL production build.
When I was younger, I used to visit my grandmother’s house, and she would always have deliciously efficient continuous deployment pipelines put out for all the children to enjoy. Now that I have a business of my own, I’ve started making continuous deployments for them to carry on the tradition. This one’s for you, gam gam.
What is Continuous Deployment?
Continuous deployment is a phrase used in software development that refers to the concept of streamlining releases of software. The better the continuous deployment of a system, the easier it is to get a change that has been made to the code live to the hands of the users.
There are a number of benefits to setting up a streamlined continuous deployment system. One is that it just makes things easier. Spending less energy deploying your application will pay off in the long run. It also means you can schedule deployments for random times (e.g. late at night when there aren’t a lot of users online), and you won’t need to have a large team there to watch over the deployment. Also, it allows you to very easily have multiple environments running in parallel. For 22d2, the project we’ll be using as an example, we have a development and a production environment, and our continuous deployment pipeline means that those two environments will keep themselves up to date, without much oversight.
The Ingredients
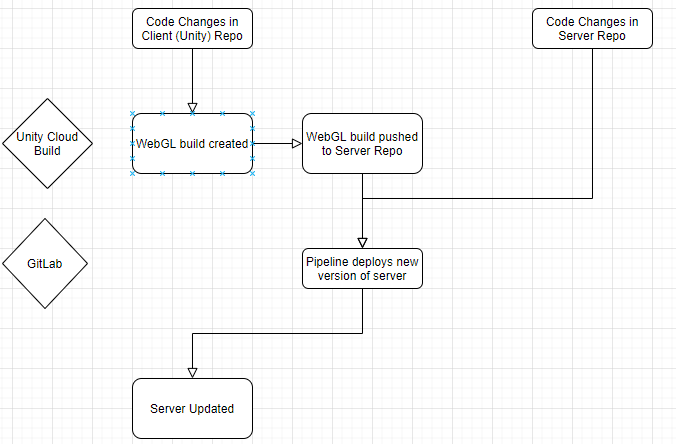
In the image to the left, you can see an image outlining the process we’re about to set up. In brief, we will push some changes to code in our client repository. Then, Unity Cloud Build will automatically make a WebGL build from those changes. That build will then get pushed to our server repository, which will then be automatically deployed to our server. With that brief understanding in mind, let’s break down each component.
Firstly, lets talk repositories. If you’re running a Unity WebGL client and a backend server, as we will for this example, you’ll need to have two repositories. You should have your client repository, which is a fairly standard Unity repository. You should also have your server repository, which manages and houses all your server code.
You’ll also need an automated build system. We use Unity Cloud Build, so that’s the example we’ll be going with. Unity Cloud Build is a service that Unity offers, which allows you to automatically create builds in the cloud. E.g. – no more long wait times while a build is created on your computer.
The second thing you’ll need is a server somewhere that is hosting your Unity WebGL build. We talked about this a little in our previous article. We use a Sails server, which is running on an AWS ecosystem (ec2 and rds).
Finally, you’ll need a version control host which allows you to perform automated deployments. We use Gitlab for all of our repositories, but Github has similar functionality, so you should be able to get it working there too.
Step One – Unity Cloud Build
Before starting this recipe, ensure that you’ve configured your Unity Cloud Build to automatically create your WebGL builds. You probably want them to be automatically built when there is a new change to your main branch, at least if you’re running a development environment, like we are.
Next, you’ll need to configure your Unity Cloud Build to automatically push the build it creates to your server repository. When UCB has finished making a WebGL build, we want it to automatically send that build to our server repository, so our server can deploy that build.
In order to do this, we’ll be taking advantage of post-build scripts. Unity Cloud Build lets you write a simple shell script to run after you’ve completed a build. Here is ours.
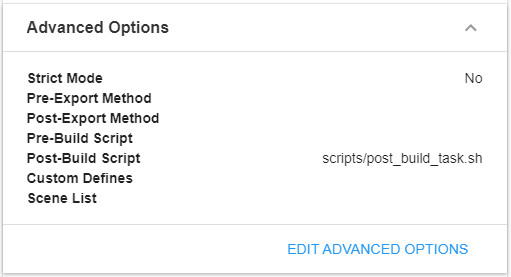
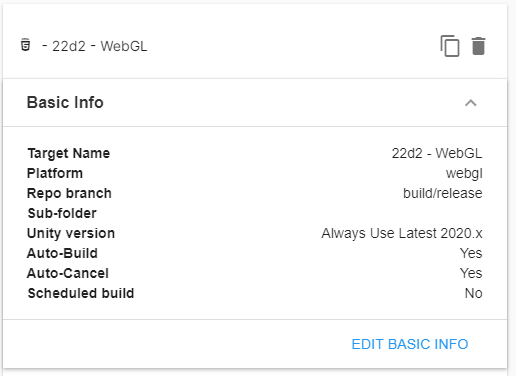
We wrote that script, and put it in a scripts folder in the root folder for our repository. Then, in UCB, in the advanced options for our WebGL target, we pointed it to that script.
variables secure!
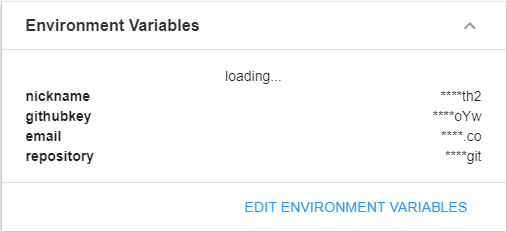
If you take a look at the shell script, you’ll notice it has a few variables. These are things like secret keys, which we don’t want to be visible in our repository. Luckily – Unity Cloud Build lets us set these up in the target. These should be fairly self-explanatory, you want them to fill in the command to clone your repository.
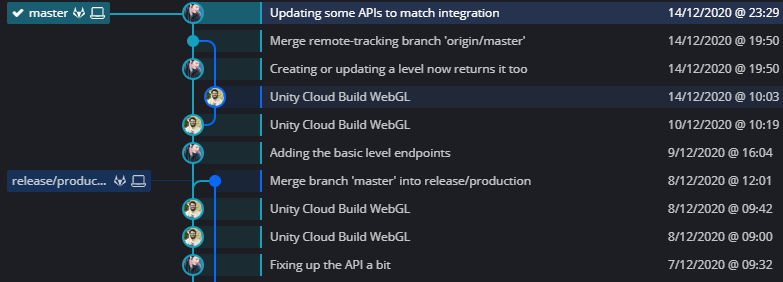
Once you’ve done the above steps, you should be able to set your UCB to create a build, and after it’s done you’ll notice that it has pushed to your server repository. Here’s what that looks like:
Step Two – The Pipeline
The second thing to do is to configure the other half of your continuous deployment. We’re already automatically creating and pushing our builds, but we need to get those on to the server, too.
Firstly, you’ll need to set up a script that you can call to update your server deployment. Again, here’s ours. This script can be called to stop, update and restart your server with the latest version of your code. Give this script a test to ensure it works, and your application updates.
Next, we’ll configure your version control host to automatically run this script when there is a change to the appropriate branch. Again, we use Gitlab for this, but other hosts should have similar functionality.
In the root directory server repository, you’ll want to create a file called .gitlab-ci.yml. This is a yaml file which contains instructions for gitlab to process about what to do when there is a deployment. Here’s ours. You’ll notice that it has a few different sections. It defines a command to run to perform automated tests, before defining the process to deploy to either development or production. Due to this, gitlab will first perform the tests, and then if they are successful, deploy to the correct environment, depending on the branch that was updated. In our example, the master branch automatically deploys to our development server, and the release/production branch automatically deploys to our production server.
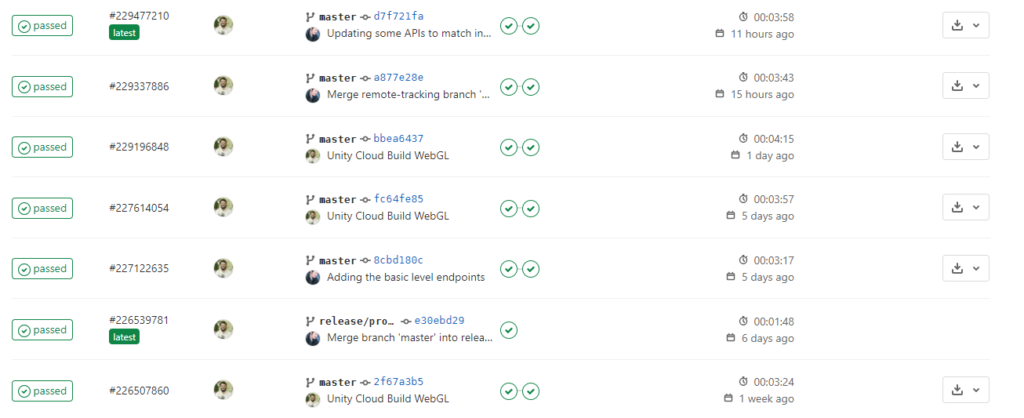
Once you push your repository with this file in it, Gitlab will automatically process it and run your pipeline. You’ll start to see something like the image below, with your pipelines passing or failing respectively.
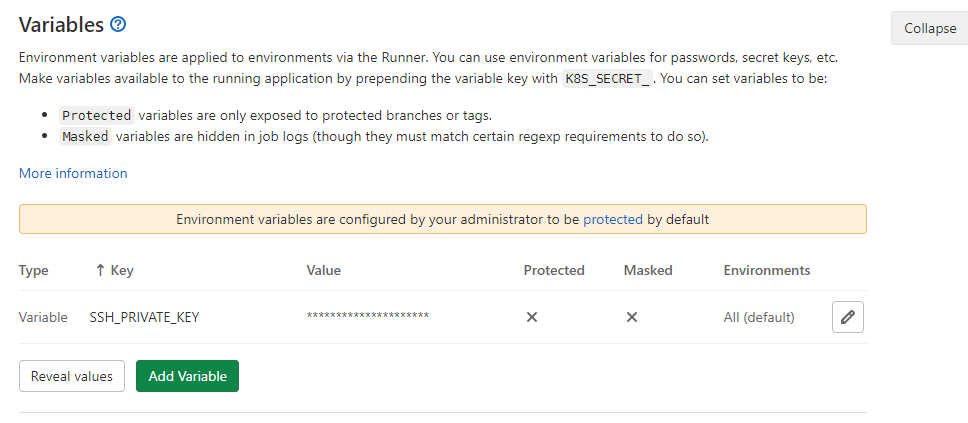
It will fail at first, because similar to with the UCB script, you’ll need to set your SSH key, a secure variable that you don’t want exposed in your repository. You can find the variable settings in Gitlab under Settings > CI / CD.
A Few Final Thoughts
Now that you’ve set up your continuous deployment, hopefully you find how much time it saves you was worth the effort. If any parts of the above article were too confusing, feel free to chuck a comment below and I’ll happily help you debug.
Processes like this are sometimes a fair amount of work to set up, but almost always they end up being worth it in the long run.
We hope you enjoyed reading this! Have a question or want to chat more about game development? Reach out to us!
Other places you can find us:
- Our other game development resources
- Join our Discord server